Towing system
Principle Author: reyhard
Description
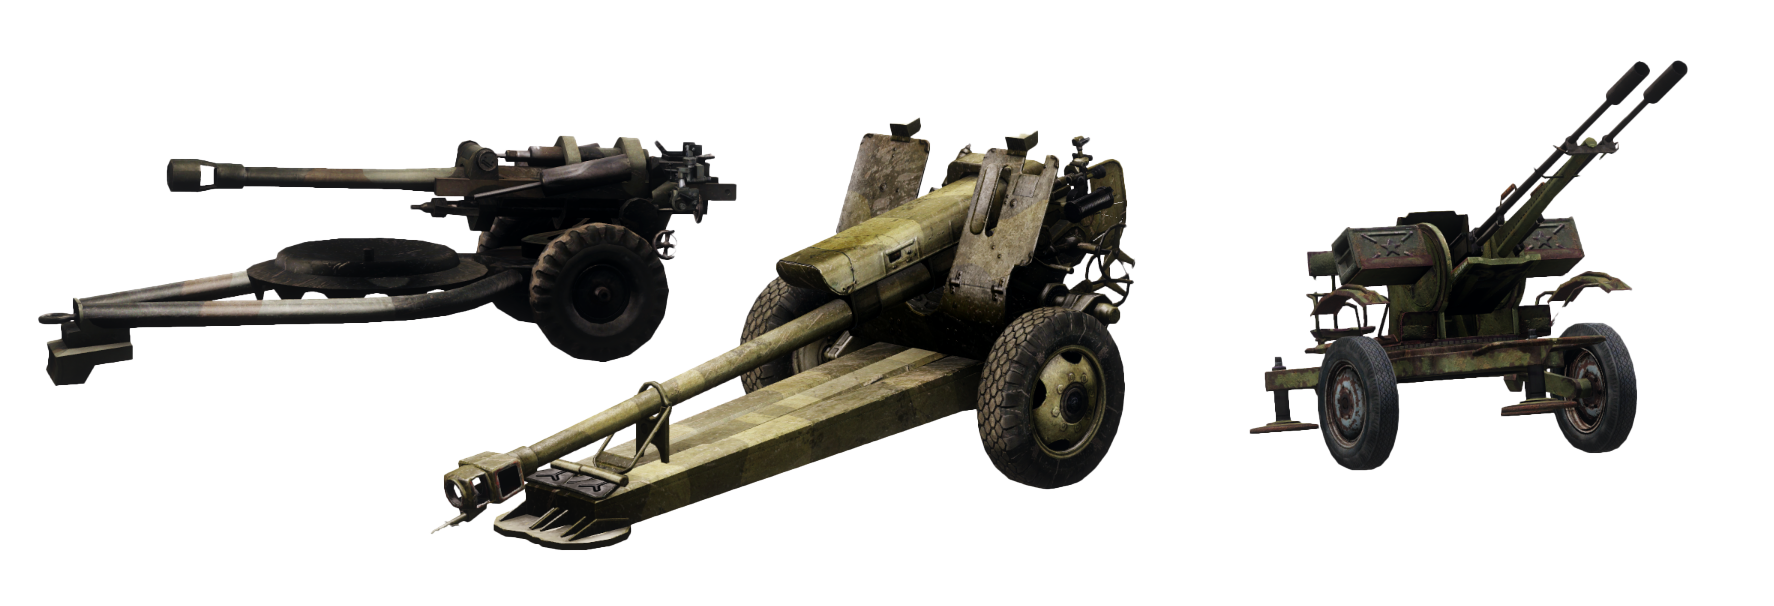
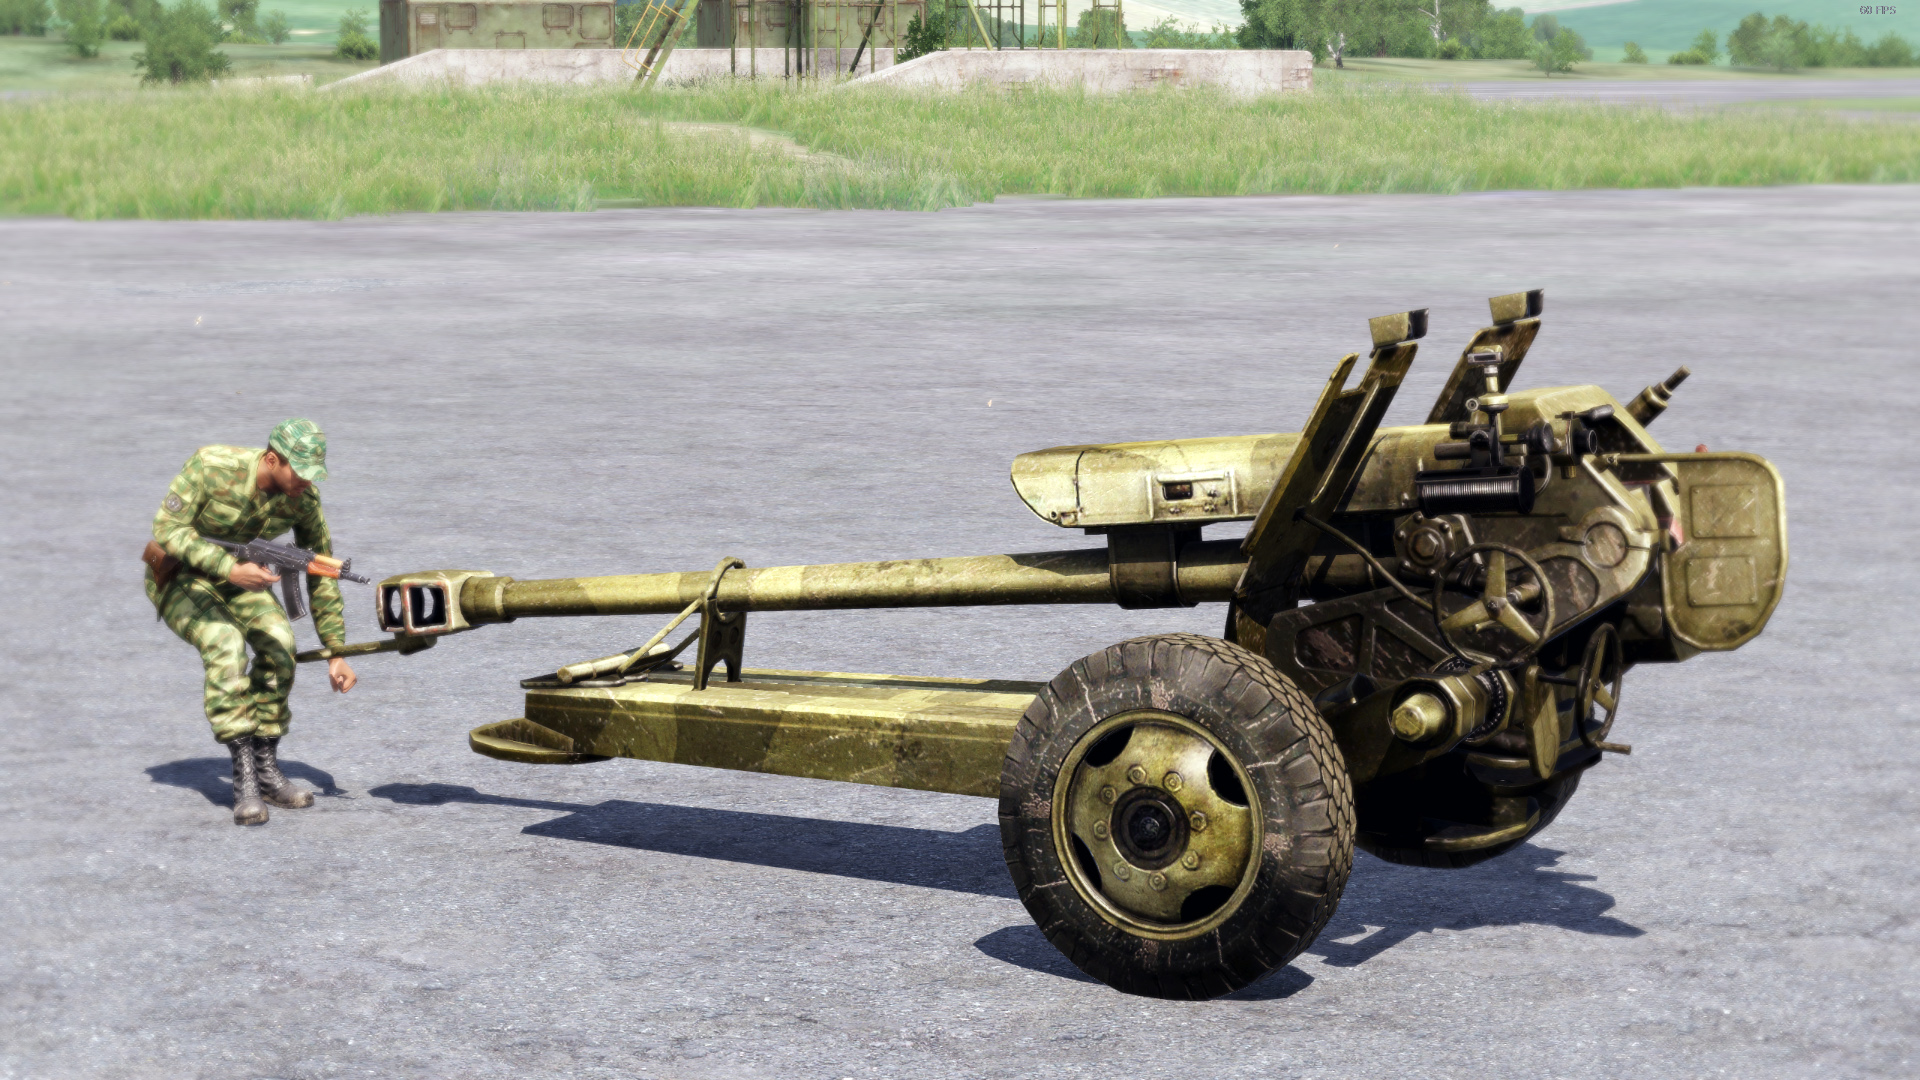
Towing system lets you move various heavy weapons around battlefield. Currently system is available for the following vehicles:
- 2A18 D-30
- ZU-23-2
- M119A2.
The entire system is designed to be lightweight and utilize directly the engine functionality as much as possible.
Known issues
- Wheels animations are not played properly on non local machines - https://feedback.bistudio.com/T150837
- Fake vehicle is quite fragile since it's using helicopter simulation. Due to that, killed event handler is used which detaches vehicle every time when vehicle is destroyed due to collision.
- One of the fake vehicle wheels can get stuck sometimes - in this case you need to stop vehicle & let the rope stabilize itself
- In shared model setup there are bunch of unknown animation sources errors - it can be solved by dummy AnimationSources entries
- Fake vehicle, even though has much smaller mass than real object, is still quite heavy and affects behaviour of the towing vehicle. While parts of it are nice (lower maximum speed and much harder for vehicle to get uphill), rear axle might look quite unrealistic
For Users
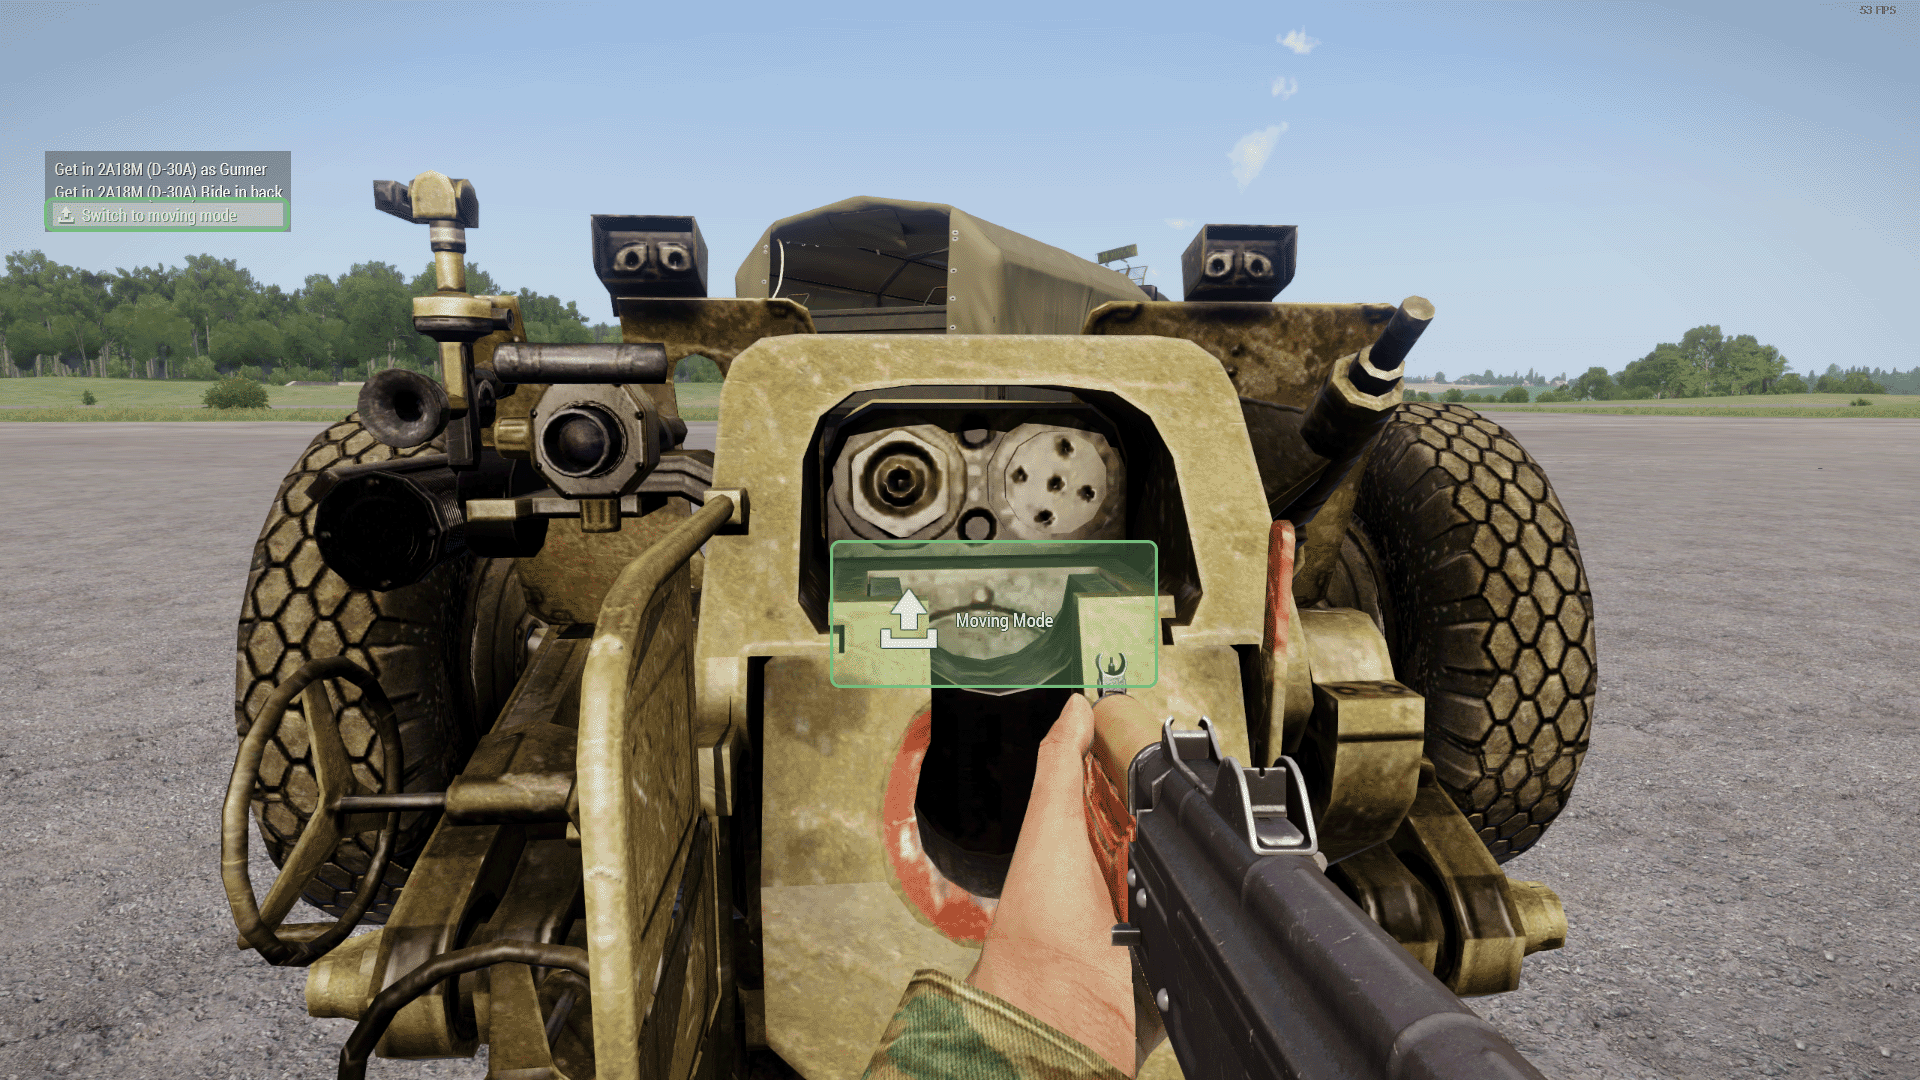
Preparing heavy weapon for towing
If selected heavy weapon is empty and not moving, you should have option to switch it to Moving Mode via the action menu. This will trigger appropriate animation & weapon will be inaccessible till it's switched again to Static Mode (also via the action menu). Those two actions should be available to you if you are looking at the centre of heavy weapon of your choice.
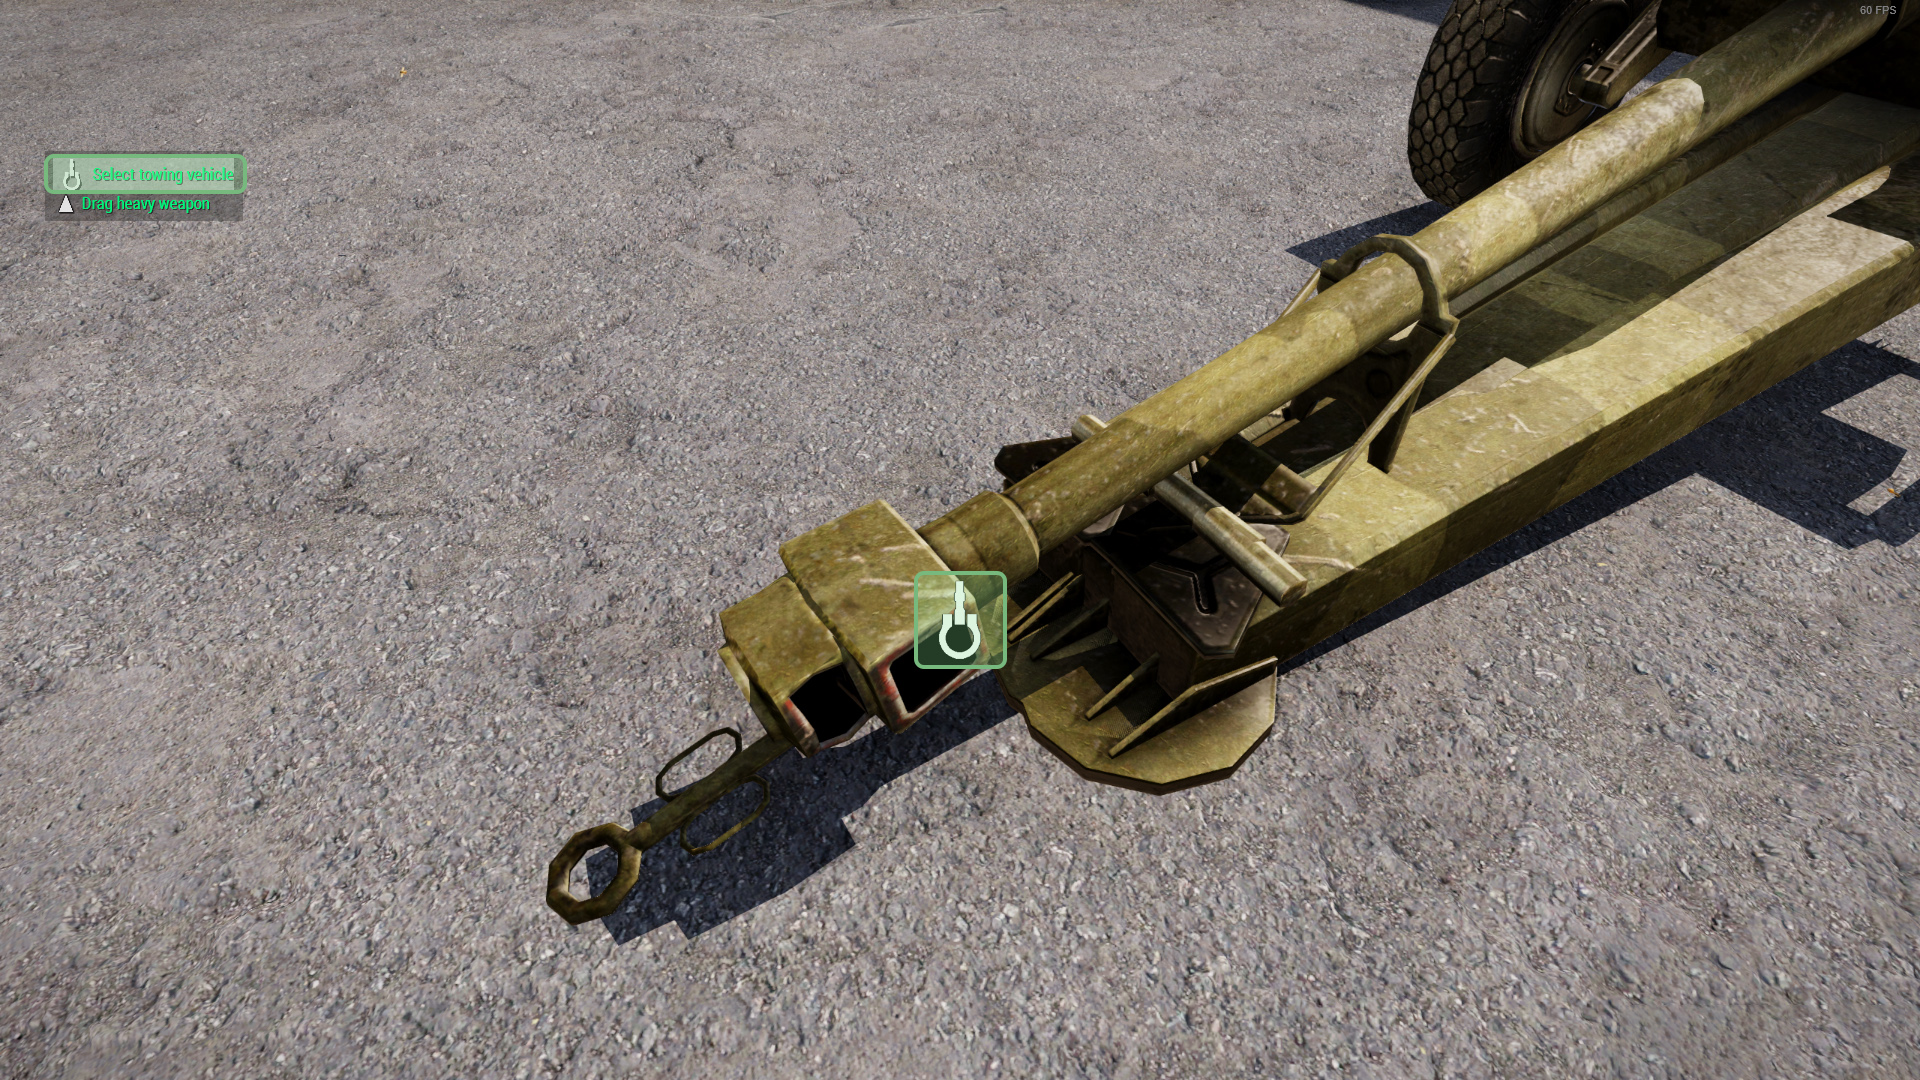
Attaching heavy weapon
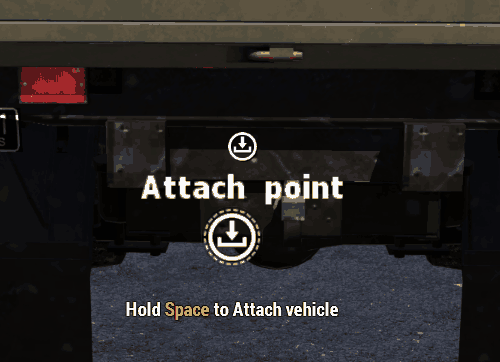
When heavy weapon is in moving mode, additional action should become available near the towing point. In the action menu you should see Select vehicle for towing  action which triggers scan for nearby vehicles which could potentially tow your weapon. If there are no valid vehicles (either they are not compatible or your heavy weapon is too heavy to be towed by selected vehicle) you will appropriate hint. Otherwise, look for Attach point
  on nearby vehicle and confirm hitching by activating Attach Vehicle action & holding spacebar for two seconds.
After that you can start towing your vehicle!
Detaching heavy weapon
To detach heavy weapon simply activate Detach  action from action menu. That action should be available when looking at the centre of selected heavy weapon.
Dragging heavy weapon
Beside towing vehicles, player are also able to drag heavy weapons to desired place with Drag heavy weapon  , which should be available in action menu when looking near the hitch of selected weapon. Once that action is activated player will play dragging animation and additional action Stop dragging
  action will appear in your action menu.
If your character cannot move, try to change moving pace with C key (Combat Pace Toggle in Infantry Movement section).
For creators
Configuration overview
System heavily relies on ropes & fact that HelicopterX simulation can use PhysX wheels and those wheels have never any brakes applied whatsoever.
In principle, mobile heavy weapon is attached to special CfgVehicles class which is using HelicopterX simulation. Original vehicle is hidden and new one is now taking care of simulation. Once vehicle is attached to that fake entity, ropes are attached to it to solve whole towing simulation part. There are few more scripts which are taking care of some edge cases and errors but basically, that's how whole thing is working.
Configuring towable vehicle
Config
Additions to heavy weapon config
Following part need to be added to static weapon configuration
Towing System configuration
rhs_fakeVehicle
Example Code
    class RHS_ZU23_base: StaticCannon
    {
        class RHS_TowingSystem
        {
            class Cargo
            {
                rhs_fakeVehicle = "rhs_ZU23_towingVehicle"; // Fake helicopterX vehicle which will be used for towing simulation
                rhs_animationsOnAttach[] = // List of animations which will be played when vehicle is attached to carrier
                {
                    "Pins_Raise",1 // nameOfAnimation, targetPhase
                };
                rhs_animationsOnDetach[] =
                {
                    "Pins_Raise",0 // nameOfAnimation, targetPhase
                };
                rhs_towedMass = 420;
                rhs_towingPoint = "tow_point"; // Memory point where rope will be attached
                rhs_additionalRopeOffset[] = {0,0,0.6}; // Offset of 2nd, helper rope. That offset is applied to carrier memory point
                rhs_ropeLength = 0.1; // Not used right now
                rhs_maxAttachDistance = 2; // Maximum attach distance
            };
        };
    };
User actions
You can use two already existing in core config actions to quickly add towing & dragging functionality to your heavy weapon. Since packing procedure differs from vehicle to vehicle, there is no universal action for it. You can however try to use ZU-23-2 action as a template.
class RHS_UserAction_Towing_Attach;
class RHS_UserAction_Towing_Drag;

class CfgVehicles
{
    [...]
    class RHS_ZU23_base: StaticCannon
    {
        class UserActions
        {
            class Fold
            {
                displayNameDefault    = "<img image='\a3\Ui_f\data\IGUI\Cfg\Actions\loadVehicle_ca.paa' size='3.5' /> Static Mode";
                displayName            = "<img image='\a3\Ui_f\data\IGUI\Cfg\Actions\loadVehicle_ca.paa' /> Switch to static mode";
                position            = "";
                radius                = 2.51;
                onlyForplayer        = 0;
                priority            = 10;
                condition            = "(alive this) && (this animationPhase 'Unfold' isEqualTo 1) && {this getVariable ['rhs_heavyWeapon_packing,true]}";
                statement            = "[this,0] call rhs_fnc_zu23_pack;";
            };
            class Unfold: Fold
            {
                priority = 0;
                displayNameDefault    = "<img image='\a3\Ui_f\data\IGUI\Cfg\Actions\unloadVehicle_ca.paa' size='3.5' /> Moving Mode";
                displayName            = "<img image='\a3\Ui_f\data\IGUI\Cfg\Actions\unloadVehicle_ca.paa' /> Switch to moving mode";
                condition    = "(alive this) && ((count (crew this)) == 0) && (this  animationPhase 'Unfold' <= 0.01) && {this getVariable ['rhs_heavyWeapon_packing,true]}";
                statement    = "[this,1] call rhs_fnc_zu23_pack;";
            };
            class AttachVehicle: RHS_UserAction_Towing_Attach
            {
                position = "tow_point";
                condition = "(alive this)&& (this  animationPhase 'Unfold' >= 0.99)";
            };
            class DragVehicle: RHS_UserAction_Towing_Drag
            {
                position = "tow_point";
                condition = "(alive this) && (this  animationPhase 'Unfold' >= 0.99)";
            };
        };
    };
};
Fake vehicle config
Once that's ready, you can tweak your fake vehicle which will be carrying actual heavy weapon
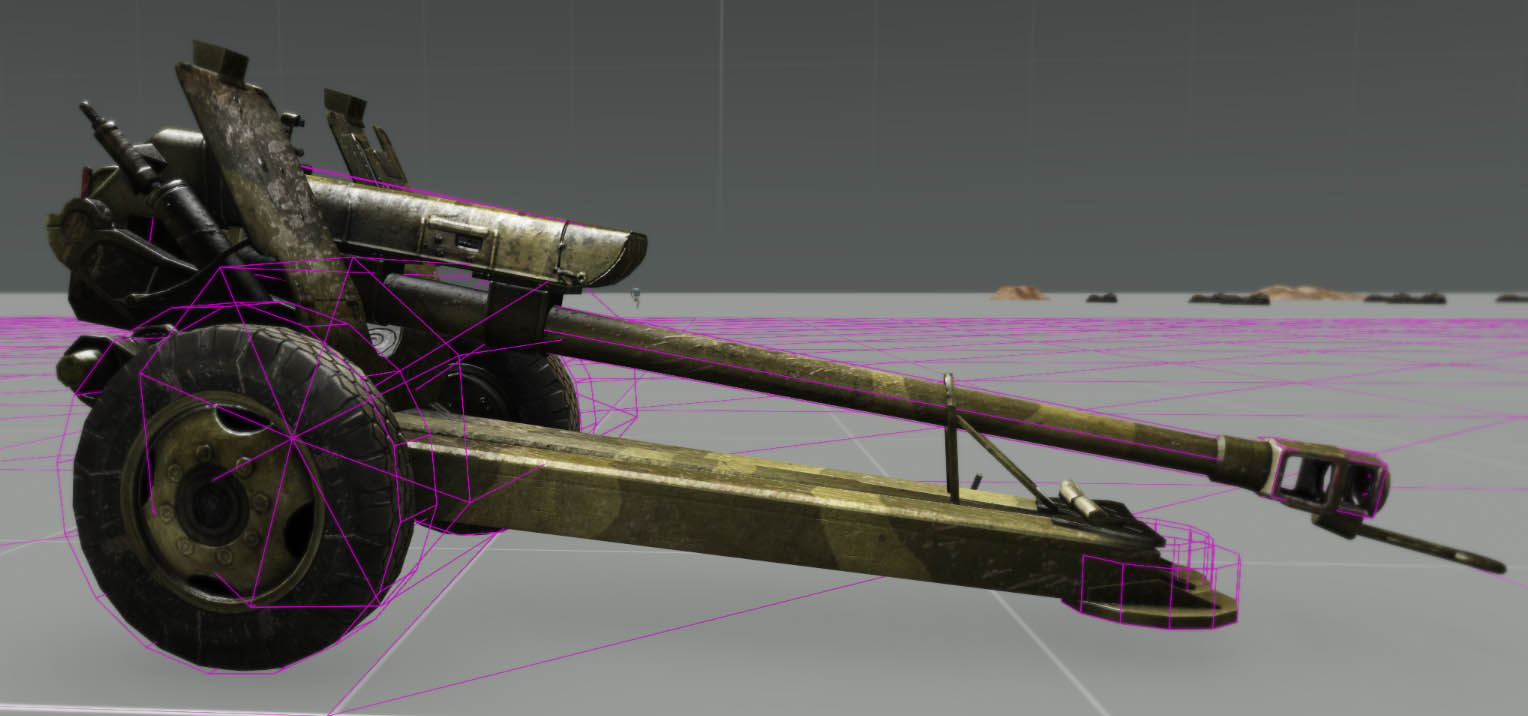
Reversed property
If your heavy weapon is dragged in opposite direction its facing (like on picture below), then use reversed = 0 property.
reversed = 0;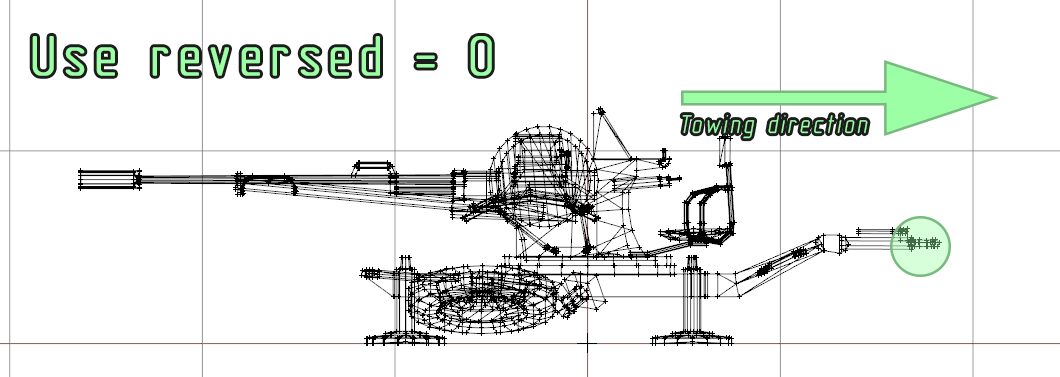
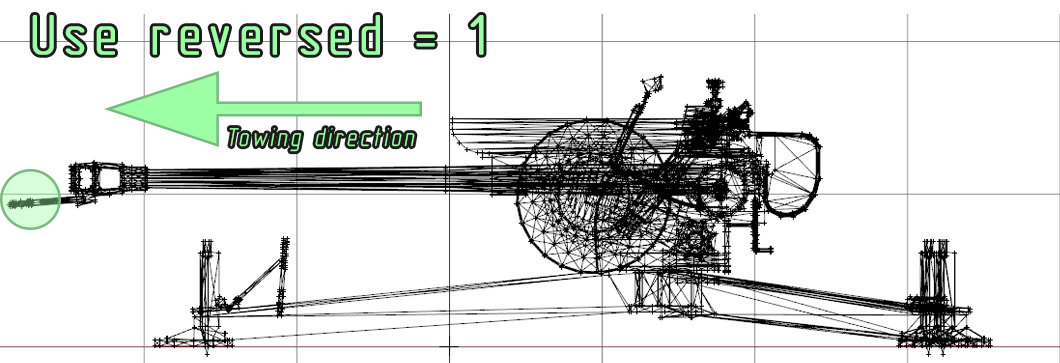
If your weapon is dragged in same direction as its facing, then you have nothing to change. By default Arma uses reversed = 1 property for all vehicles so there is no need to redefine it.
Model
If you are using shared model setup it's important to define camo selections - otherwise you could end up in situation where fake carrier uses different textures than the actual heavy weapon.
        model                        = "\rhsafrf\addons\rhs_heavyweapons\ZU23\zu23";
        hiddenSelections[]            = {"camo1","camo2"};
        hiddenSelectionsTextures[]    =
        {
            "rhsafrf\addons\rhs_heavyweapons\zu23\data\zu23_base_co.paa",
            "rhsafrf\addons\rhs_heavyweapons\zu23\data\zu23_co.paa"
        };
Animation sources
        class AnimationSources
        {
            class Pins_Raise {source="user";animPeriod = 1;initPhase=0; };
            class Unfold {source="user";animPeriod = 1.6;initPhase=1;};
            // Wheel animations are linked to PhysX configuration
            class Wheel_1_source            {source = wheel; wheel = Wheel_1;};
            class Wheel_2_source            {source = wheel; wheel = Wheel_2;};
            // Notice that gun is elevated by 10 degrees up
            class maingunT_source             {source="user";animPeriod = 1;initPhase=0.349066; };
            class mainTurretT_source: maingunT_source {initPhase=0;};
        };
PhysX
One of the most important part of configuration of towable heavy weapon is PhysX configuration. First, it's good to add any component from Geometry PhysX which could potentially collide with surface. Components listed in driveOnComponent array has lower friction so going through small bumps should be easier if those problematic parts are listed there.
driveOnComponent[] = {wheel_1_physx,wheel_2_physx};Next is important thing to do is to setup the wheels. Configuration of it is exactly the same as for any other wheeled vehicle and following page can be used as reference:
https://community.bistudio.com/wiki/Arma_3_Cars_Config_Guidelines#Wheel_parameters
class Wheels
{
    class Wheel_1
    {
        [wheel parameters]
    };
    class Wheel_2: Wheel_1
    {
        [wheel parameters]
    };
};
User actions
If you are inheriting from RHS_TowedWeapons_Base then user action is already inherited from that. If you would need to tweak i.e. range of user action availability, you can inherit following user action and change parameters as needed
// Part of core config - just for reference! If you are using it in your addon justy type
// class RHS_UserAction_Towing_Detach;
class RHS_UserAction_Towing_Detach
{
    displayNameDefault    = <img image='\rhsafrf\addons\rhs_main\data\actions\rhs_tow_detach_ca.paa' size='3.5' />;
    displayName            = "<img image='\rhsafrf\addons\rhs_main\data\actions\rhs_tow_detach_ca.paa' size='1.5' /> <t color='#00FF7F'>Detach vehicle</t>";
    position            = "";
    radius                = 2.5;
    onlyForplayer        = 0;
    priority            = 15;
    showWindow            = 1;
    condition            = "(alive this) && {speed this < 3}  && {this getVariable ['rhs_towing_detach',true]}";
    statement            = "[this] spawn rhs_fnc_towing_detach;";
};

// Part of CfgVehicles
class CfgVehicles
{
    class Helicopter_Base_F;
    class RHS_TowedWeapons_Base: Helicopter_Base_F
    {
        class UserActions
        {
            class Detach: RHS_UserAction_Towing_Detach {};
        };
    };
};
Example Code
    // Base class for ZU-23 variants
    class rhs_ZU23_towingVehicle_base: RHS_TowedWeapons_Base
    {
        // Vehicles are towed much better if rope attached in front of them.
        reversed                    = 0;
        displayname                    = "ZU23 Tow";

        // We are using one, shared model for both static & dynamic variant
        model                        = "\rhsafrf\addons\rhs_heavyweapons\ZU23\zu23";
        // Hidden selections are quite important if you have variants with multiple textures
        // If those sections are defined here, script will apply correct textures from main vehicle
        hiddenSelections[]            = {"camo1","camo2"};
        hiddenSelectionsTextures[]    = {"rhsafrf\addons\rhs_heavyweapons\zu23\data\zu23_base_co.paa","rhsafrf\addons\rhs_heavyweapons\zu23\data\zu23_co.paa"};

        // Animations
        class AnimationSources
        {
            class Pins_Raise {source="user";animPeriod = 1;initPhase=0; };
            class Unfold {source="user";animPeriod = 1.6;initPhase=1;};
            // Wheel animations are linked to PhysX configuration
            class Wheel_1_source            {source = wheel; wheel = Wheel_1;};
            class Wheel_2_source            {source = wheel; wheel = Wheel_2;};
            // Notice that gun is elevated by 10 degrees up
            class maingunT_source             {source="user";animPeriod = 1;initPhase=0.349066; };
            class mainTurretT_source: maingunT_source {initPhase=0;};
        };

        // Simulation part
        driveOnComponent[]            = {wheel_1_physx,wheel_2_physx};

        // Standard PhysX wheel simulation
        class Wheels
        {
            class Wheel_1
            {
                steering                    = true;
                side                        = "left";
                boneName                    = "damper_front";
                suspForceAppPointOffset        = "wheel_1_center";
                tireForceAppPointOffset        = "wheel_1_center";
                center                        = "wheel_1_center";
                boundary                    = "wheel_1_bound";
                suspTravelDirection[]        = {0, -1, 0};
                width                        = 0.27;
                mass                        = 115;
                MOI                            = __EVAL(0.5*1115*(0.288^2));        // radius 0.288m

                dampingRate                    = 0.1;
                dampingRateDamaged            = 1;
                dampingRateDestroyed        = 1000;

                maxBrakeTorque                = 0;
                maxHandBrakeTorque            = 0;

                maxCompression                = 0.1;
                maxDroop                    = 0.2;

                sprungMass                    = -1;
                springStrength                = 11600;
                springDamperRate            = 18280;

                longitudinalStiffnessPerUnitGravity    = 15000;
                latStiffX                    = 12.5;
                latStiffY                    = 18.0;
                frictionVsSlipGraph[]        = {{0, 15}, {0.5, 5}, {1,2}};
            };
            class Wheel_2: Wheel_1
            {
                steering                    = true;
                side                        = "right";
                boneName                    = "damper_left";
                suspForceAppPointOffset        = "wheel_2_center";
                tireForceAppPointOffset        = "wheel_2_center";
                center                        = "wheel_2_center";
                boundary                    = "wheel_2_bound";
            };
        };
    };
    // Vehicle class with scope = 1;
    class rhs_ZU23_towingVehicle: rhs_ZU23_towingVehicle_base
    {
        scope = 1;
    };
Model
P3D
If using shared model setup, keep in mind following things:
- PhysX wheels should be below actual PhysX geometry components - otherwise vehicle will slide on the ground. That usually can be solved by additional animations which can i.e. hide problematic geometries. See:
- Centre of mass should be placed in reasonable place - otherwise simulation might fail
Wheels memory points
As mentioned before, your p3d needs few additional memory points for wheels centre & bound. Since those memory points can't be animated, place them in a position where visual wheels will be after unfolding.
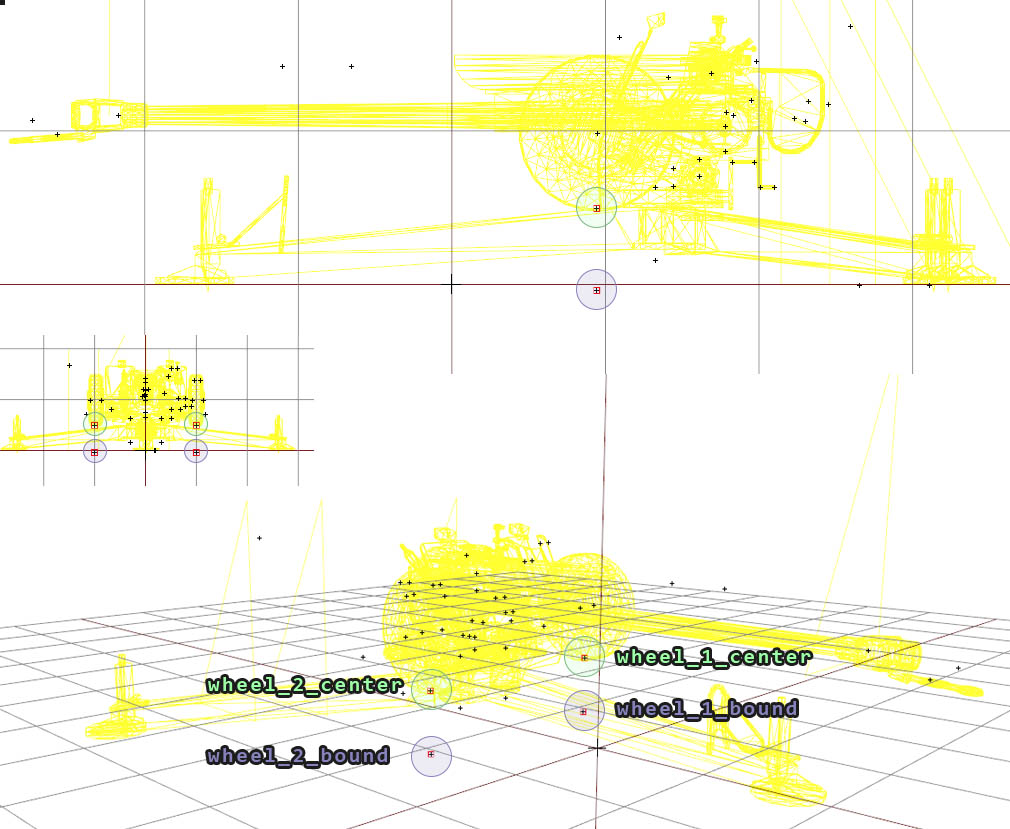
Those wheels will look like that in game. Don't forget that maxDroop & maxCompression affects wheel movement and if you don't have animated suspension, then position of the wheels might change a little bit. Setting maxDroop & maxCompression to 0 is not recommended since vehicle behaviour will be fair from ideal after such change
model.cfg
In setup which is using single model for both static & moving variants, you can use following code to have animated wheels.
            // Secondary animation
            class MainGunT: MainGun {source="mainGunT_source";};
            class MainTurretT: MainTurret {source="MainTurretT_source";};
            // Wheels animations - those are linked in AnimationSources
            class wheel_1_rot
            {
                type            = "rotation";
                source            = "wheel_1_source";
                selection        = "wheel_1";
                axis            = "wheel_1_axis";
                sourceAddress    = "loop";
                animPeriod        = 1;
                minValue        = 0;
                maxValue        = 1;
                angle0            = 0;
                angle1            = rad -360;
            };
            class wheel_2_rot: wheel_1_rot
            {
                source        = "wheel_2_source";
                selection    = "wheel_2";
                axis        = "wheel_2_axis";
                angle1            = rad 360;
            };
Configuring towing vehicle
rhs_maxCargoMass
Float: Max cargo mass that this vehicle can tow.
rhs_attachPoint
String: Name of memory point where attach action & ropes will orignate from
rhs_attachPointPos
Array: If memory point is not present, model space coordinates can be provided instead
Example Code
        class RHS_TowingSystem
        {
            class Carrier
            {
                rhs_maxCargoMass        = 2500; // Max
                rhs_attachPoint            = ""; // Name of memory point where attach action & ropes will orignate from
                rhs_attachPointPos[]    = {0,-3.5,-1.1}; // If memory point is not present, model space coordinates can be provided instead
            };
        };
For Mission Makers
Variables & functions
Below you can find some of the functions & variables which you can use in your missions
Functions
| Action | Name of function | Description |
|---|---|---|
| Attaching vehicle | [_TowedWeapon,_TransportVehicle] call rhs_fnc_towing_attach; |
Initiates towing. Effect global - run it only where both vehicles are local! 0: _TowedWeapon: vehicle which we want to tow 1: _TransportVehicle: vehicle which will be towing selected heavy weapon |
| Detach vehicle | [_TowedWeapon] call rhs_fnc_towing_detach; |
Detaches towed weapon. Effect global - run it only where both vehicles are local! 0: _TowedWeapon - weapon which should be detached - accepts both fake vehicle & actual towed weapon as an argument |
| Packing & Unpacking ZU-23 | [_zu23,0] call rhs_fnc_zu23_pack; - Pack[_zu23,1] call rhs_fnc_zu23_pack; - Unpack |
Packs or unpacks ZU-23. Effect global - run it only where both vehicles are local! 0: _zu23 - ZU-23-2 object which should switch its state 1: 0 - Desired state - 0 = gun will be folded, 1 = gun will be unfolded |
| Packing & Unpacking D-30 | [_d30,0] call rhs_fnc_d30_pack; - Pack[_d30,1] call rhs_fnc_d30_pack; - Unpack |
Packs or unpacks D-30. Effect global - run it only where both vehicles are local! 0: _d30 - D-30 object which should switch its state 1: 0** - Desired state - 0 = gun will be folded, 1 = gun will be unfolded |
| Packing & Unpacking M119 | [_m119,0] call rhs_fnc_m119_fold; - Pack[_m119,1] call rhs_fnc_m119_fold; - Unpack |
Packs or unpacks M119. Effect global - run it only where both vehicles are local! 0: _m119 - M119 object which should switch its state 1: 0** - Desired state - 0 = gun will be folded, 1 = gun will be unfolded |
Variables
| Name of variable | Where it can be used | Description |
|---|---|---|
| rhs_towing_towedVehicle | Fake vehicle, Towed vehicle | Object: Returns object which is being towed (heavy weapon) |
| rhs_towing_towingVehicle | Fake vehicle, Towed vehicle | Object: Returns object which is towing fake vehicle |
| rhs_towing_fakeVehicle | Towed vehicle | Object: Returns fake vehicle (heavy weapon carrier) |
Example usage
rhs_zu23 getVariable ["rhs_towing_towedVehicle",objnull]